


- 13 October 2020
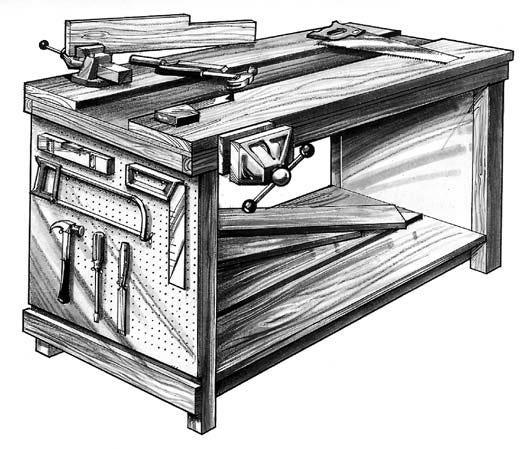
Build your own work bench
A STURDY TIMBER WORKBENCH IS A MUST FOR ALL SORTS OF MONEY-SAVING PROJECTS AND REPAIR JOBS AROUND YOUR HOME.
This strong, simple to build project features a carpenter’s well - that’s a channel shaped section in the centre of the bench top which makes jobs such as cutting easier, stops tools from falling off the bench and keeps nails, bolts, screws and other fittings from rolling off too.
It’s such a practical, adaptable design - you can vary the length and/or width to suit whatever space or place you’ve planned for your new bench in the garage, shed or carport.
STEPS 1 & 2
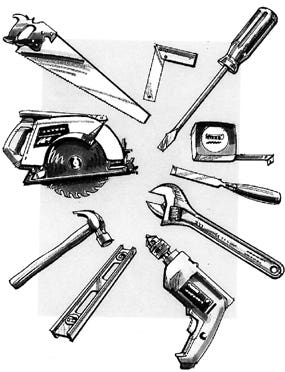
Materials & tools required
MATERIALS REQUIRED
Shelves and sides
5 pieces 780mm x 190mm x 19mm
Kick board
1 piece 780mm x 90mm x 19mm
Backing Sheet
1 piece 810mm x 690mm x 4mm pine ply
Hardware
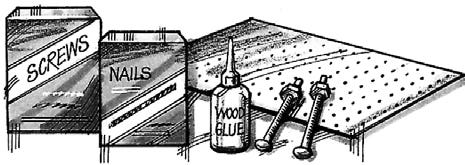
10 x 50mm x 8 gauge counter sunk wood screw and 10 x 9.5mm screw head button cap
OR
Ten plastic block fittings and 40 wood screws (see Step One), 4 x 5mm shelf supports, 3 x 22mm x 22mm angle brackets, 6 x 16mm x 6 gauge angle bracket screws, one packet 30mm bullet head nails.
STEP 3
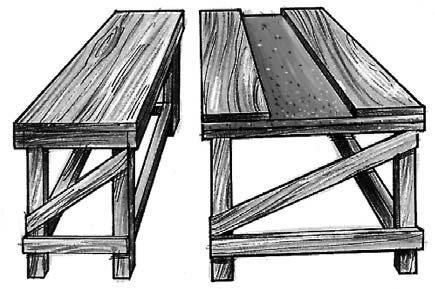
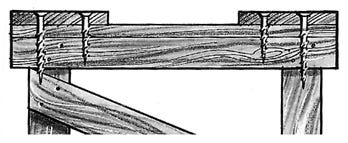
Assembling the bench - the top frame
Construct the frame for the bench top first, by cutting 2 x 1800mm and 4 x 810mm lengths of the 90 x 45mm timber. When cutting several pieces of timber to the same length like this, clamp them together all square at one end, then measure and mark the top piece and cut them as one. Then, even if your measurements may have been slightly out, you’ll still have identical lengths of timber to work with.
Place the pieces you have just sawn on edge, on the floor or other flat area to work on. Form the pieces into a rectangle as shown in the diagram. This will form the support frame for the bench top. Glue and nail or screw the pieces together after checking that everything is square (measure on the diagonal from corner to corner, these should be equal, if not, move the frame slightly at opposite corners until the measurements are equal).
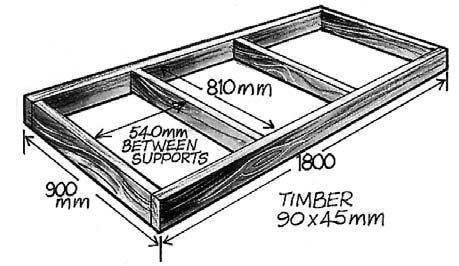
Now fix the particleboard top piece, 1800 x 900 x 19mm, by gluing and nailing to the frame as shown in the diagram.
STEP 4
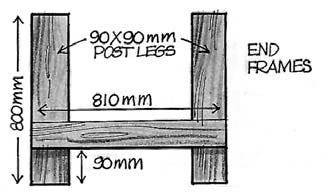
Make the end frames
Cut 4 x 800mm lengths from the 90 x 90mm timber. These will be the legs for the bench. Loosely bolt or screw a piece of 90 x 45 x 810mm previously cut timber across the bottom of each pair of legs, at 90mm from the bottom or floor level.
Connect these 2 end frames on one side by loosely bolting or screwing a piece of 90 x 45 x 1800mm timber at 90mm from the bottom of the legs as shown in the diagram. Then cut and fix a diagonal brace using the 90 x 45mm timber on each diagram, for extra stability.
Trim the bracing pieces to length by sawing flush with the outside of the legs once fixed in place.
Now cut and fix a piece of 190 x 19mm timber across the horizontals of each end frame to provide additional strength to the base frame and also provide you with a handy shelf underneath. You could add 1 or 2 more pieces of 190 x 19mm timber to give you a wider shelf for more storage space.
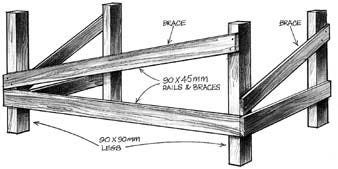
Additional coach bolts, nuts and washers can now be fixed to all the joints to totally secure the frame - but don’t tighten them up until you have fitted and fixed the bench top in position.
STEP 5
Fitting the bench top
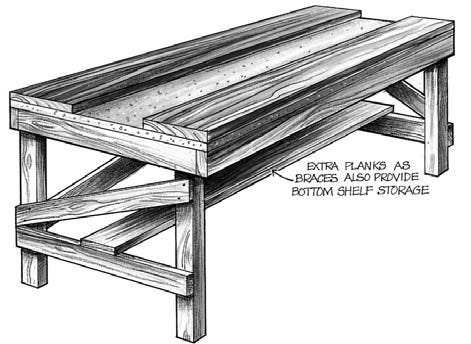
Lift the bench top you have already made in Step 1 and position it on top of the four legs - you might need an extra pair of hands to help you do this. The legs should fit snugly into each inside corner of the bench top frame. Use screws to secure through top frame to the top of each leg.
Now take 2 pieces of 190 x 19 x 1800mm timber and using countersunk screws, fasten them to the particleboard at the front and rear as shown in the diagram. When placing the screws, make sure that the longer 100mm screws are positioned so that it will penetrate into the top of each leg to add security to the bench top.
The pieces of 190 x 19mm timber that you have now fixed in place add extra strength to the bench top so that a wood or metal working vice, or one of each, can then be attached. These pieces also form the carpenter’s well in the centre of the bench top. For a longer lasting working surface, it would be best to use KD dressed hardwood for these 2 top pieces instead of pine (which is a softwood).
Now, tighten up all bolts securely and your strong, all-purpose workbench that you have built yourself is complete and ready to use! Protect it from the weather and it will give you years of use - it might even become a family heirloom!
STEP 6
Extra tool storage
It’s easy to go on and customise your new workbench by adding optional end tool boards. Simply cut 2 pieces of pegboard about 810mm wide x 620mm high and screw them to the frames at each end. Now hang your tools on spring clips or pegboard hooks in neat order and mark their outline with a felt pen to make it easy to replace them where they belong.
You will also be able to see at a glance what’s missing or who hasn’t put something back after borrowing it!
TIPS FROM THE TRADE
- To help you drill holes accurately and vertically, use your carpenter’s square and place the base on the timber to be drilled with the ruling edge vertical. Use this edge as a guide to line up your drill as vertically (or horizontally) as possible.
- Locate your new workbench under or adjacent to a window if possible, to make best use of any natural light in your workshop, shed or garage.
- If you install an overhead light such as a flouro tube, position it over the middle of the workbench so that you won’t be standing or working in your own shadow.
- Don’t use any power tools if the floor you are standing on is wet or even just damp - get a piece of dry plywood or hardboard to stand on.
- When using power tools, remember to always use suitable safety glasses to protect your eyes, and especially with a power saw, use ear muffs for protection.
- When using a hand plane, always plane with the grain of timber and don’t try and take too much off with each sweep of the plane as you could spoil the surface - deep marks from the edge of the blade are hard to hide!
- Measure carefully and accurately - It makes all the difference to the end result and you won’t waste any expensive timber - remember measure twice and cut once!


