


- 14 October 2020
Build your own children's play house
ANY HANDY PERSON CAN BUILD THIS CHILDREN’S PLAY HOUSE.
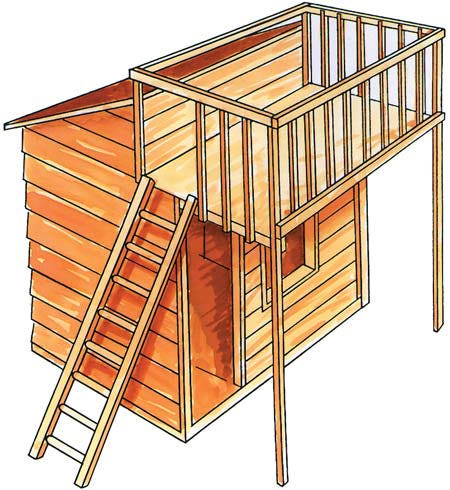
This children’s play house is simple to construct and can be built to any reasonable size, depending on the area you have available and the ages of your children. For the kids, it can become their own private place where they can play out their own imagination. More importantly for you, you’ll know just where they are - safe in your own backyard.
MATERIALS
- General framing 150x50, 100x50, 75x50 and 50x50mm KD Pine.
- Sub-floor frame 100 x 50mm Treated Pine.
- Cladding Select from timber weatherboards in Baltic Pine or Western Red.
- Cedar or cement sheet planks such as Hardiplank. You could also use exterior grade plywood sheeting
such as Shadowclad. - Window and door frame 100 x 50mm KD Pine.
- Upper Deck Railing Top rail 75 x 50mm with 50 x 25mm uprights (or balusters) - use dressed Treated Pine or Cypress Pine.
- Ladder 30mm diameter hardwood dowel.
- 75 x 50mm KD Pine (knot-free)
- Corner angles Timber or metal, to suit type of exterior cladding selected.
- Floor covering (inside and balcony decking). Select from timber deck boards or flat sheeting in 12mm
timber or 6mm cement sheet - see the huge range at any HOME Timber & Hardware store - Galvanised hoop iron
- 100 x 100mm metal angle
- 100 and 75mm bullet flashing head galvanised nails
- 8mm galvanised coach bolts
- Processed nails
- Bugle batten plated screws
- Flat head galvanised nails
LOCATION
You can choose to install a concrete slab beforehand or use the simple timber floor as shown in our plan. If the ground tends to be wet,we suggest you install a concrete slab, however high, dry ground would make a timber floor preferable.
STEP 1
Build the Flooring
Cut the two (2) long bearers to the length of the Play House you have decided on, then cut enough cross bearers (to suit 450mm spacing) for the width of the Play House, using the 100 x 50mm treated pine timber. Nail the cross bearers in between the two (2) long bearers leaving the end flush. Don’t forget to use 100mm bullet head galvanised nails, as these won’t rust.Check that the frame is square by measuring across the diagonal corners, moving the frame until it is square. Now cover the frame by nailing down your selection of floor covering, which will provide a firm base for you to work on while building the rest of the Play House. When you have selected where you want to locate the structure, roughly level the ground area and place the completed floor frame, checking that it is level and packing under the frame where necessary.
STEP 3
Assemble Roofing
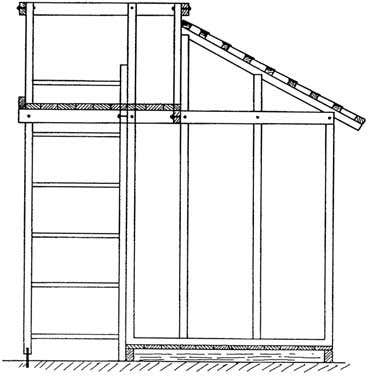
Next, cut enough rafters for the roof to suit 450mm max spacing and long enough to give approx 300mm overhang for the rear eave. Cut an angled notch (or birdsmouth) in each end rafter at each stud position to give the roof slope, then notch the intermediate rafters at the top ends and over the side wall frame. You will need to cut a length of 150 x 50mm timber to join the two (2) end wall frames at the top to carry the roof rafters.
Now nail securely in position with 75mm bullet head nails. Measure and trim the rafters to give an even overhang. Next, cut to length and nail in place roof battens from 50x50mm timber across the top of the rafters at the recommended spacing for the type of roof covering you have decided to use.
STEP 4
Install the Lining
It would be an idea at this stage to cut and fit the internal lining while you still have reasonable access to the inside of the Play House. There are a number of choices for lining inside, such as masonite, tongue and groove panelling, plywood and fibre cement sheeting or you may choose not to have any internal lining.
STEP 5
Build the Balcony and Corner Posts
Now measure, cut and fit four (4) support posts for the balcony down to ground level as shown on the drawing, plus three (3) shorter uprights to carry a horizontal piece to support the handrail above the top of the roof (to deter children from climbing out onto the roof).
The two (2) outer or corner posts should be a durable in-ground timber species such as Crypress Pine and cut long enough to go about 300mm into the ground; sit them on about 50mm of crushed rock or bricks in the bottom of the hold. Check that the four (4) posts are all at the same height (trim as necessary) then cut and fit the handrails from 75x50mm Cypress Pine timber, use 8mm diameter galvanized coach bolts for all these outside joints instead of nails as it will make a much stronger job.
Cut two (2) pieces of 150x50mm timber the length of the Play House and fix in position to carry the balcony floor across the rear. Cut and nail another piece of 150x50mm timber between these bearers at the mid-point. This will provide support for the balcony flooring material.
STEP 6
Add the Ladder
For the sides of the ladder, select two pieces of 75x50mm pine that are knot-free. Cut the two pieces to a length that allows the ladder to about the edge of the balcony of the Play House.
The rungs of the ladder are made from 30mm round hardware dowel cut to length that suits the width of ladder required. Drill holes approx halfway through the two side pieces 300mm apart to fit the rungs. Make sure the rungs fit tightly into the holes and secure the rungs with flat head galvanised nails.
Fix the ladder to the balcony of the Play House by drilling a hole through the top of both sides and using treated pine screws, attach the ladder to the edge of the balcony.
STEP 7
Add the Balcony Floor/Handrails
Cut and fit the material you have selected for the floor, making sure that you smooth the edge at the ladder entry end. Now, cut the 75cx50mm timber for the handrails at lengths to suit and bolt to the top of the uprights with 8mm diameter, galvanised coach bolts.
Finally, mark out the vertical baluster positions at 150mm centres along both the top handrail and the bottom floor rail and measure the length required. Using the 50x50mm pine timber, cut the number required and fix in position on the inside of the horizontal rails using 75mm countersunk 'bugle batten'plated screws. Make sure that the spacing between the balusters is not more than 125mm.
Leave the area above the ladder as this is the access point to the balcony.
STEP 8
Clad the Exterior
Now you can start to clad the exterior of the Play House with the particular classing material you have earlier selected. Use the recommended corner jointing material for the cladding being used. For example, if you will be using timber weatherboards, use a square timber stop at the corners to butt the weatherboards to. If using fiber cement sheeting or plants, use the special metal corners available in accordance with manufacturer's directions. If you are using weatherboards, start from the bottom up and work from a left hand corner, using galvanised flat head nails for fixing.
Lastly, install the selected rood covering material to the battens previously nailed in place. Make sure that the covering extends about 25mm past the last batten at the bottom so that water won't run back into the timber. You will need to then install some metal angle flashing (suggest 100mmx100mm) down each side of the rood and across the top at the balcony level. Make sure you don't leave any sharp edges for children to catch themselves on.
STEP 9
Finish off the Exterior
Now to put the finishing touch to your new Children's Play House, smooth off any rough surfaces and edges. Apply a good quality exterior paint or stain either to suit your house colour scheme or with a selection of bright colours to provide an attractive feature for your children to play in. Visit your local HOME Timber & Hardware store and select from the wide range of paints and stains available.

TIPS FROM THE TRADE
- Any timber that butts up against other sections of timber on the outside should be given a coat of paint or stain before fixing in position to protect the end grain.
- Measuring is easy, but materials are expensive, so double check all the measurements and markings before cutting a piece of timber.
- When you need several pieces of timber all the same length, you can save time by clamping them together, measure once and cut all together. Even if you have been a fraction out in measuring, at least all pieces will be the same length.
- When fixing outside, you should always use galvanized nails/bolts as standard bright steel nails etc, will rust and cause unsightly stains on the timber-very hard to remove or hide.
- Always wear goggles for eye protections and ear muffs when using power tools.
- Follow the manufacturer's instructions when applying exterior stains and paints - short cutting will result in an inferior job.


