


- 14 October 2020
HOW TO... GROW PLANTS FROM SEED
Seed raising can be the easiest and most rewarding method of obtaining plants for your garden. If you follow these simple steps you’ll be delighted with the results.
WHAT YOU WILL NEED
1. Choosing your seed
Really fresh seed can give up to twice the germination rate of seed that has been kept for too long. Check the ‘use by’ date printed on most seed packets.
2. Seed sowing mixes
Seed sowing mix should be free draining, yet capable of holding sufficient moisture to allow the seeds to germinate. Never use conventional potting mixes for seed sowing. Many contain levels of fertilizer which can burn sensitive young roots or will cause seedlings to grow abnormally quickly.
Ask us at HOME to recommend the best quality Seed Raising mix.
3. Containers
There are a bewildering array of pots, trays, tubes and containers suitable for use. Just remember that it is better to use a larger container so that you can spread your seedlings out. Over-crowded seedlings will be thin and weak and make poor plants.
GETTING STARTED
1. Cleaning your containers
Pots and containers should be cleaned thoroughly before use. Soils caked to the side of the pot can harbour diseases. Washing with disinfectant and a few drops of household bleach, washing liquid or a proprietary brand of garden cleanser should do the trick. Rinse containers with clean water before filling with fresh soil. Dry thoroughly.
2. Filling with mix
Fill the container loosely with seed raising mix until it is slightly proud of the rim. Scrape off the excess with a piece of wood to leave a level surface. The seed raising mix should now be compressed to form the seed bed.
The easiest way is with a flat-bottomed wooden press. Make your own from oddments of timber shaped so that they will just fit into your container. A piece of wood nailed to the back of the press will make it easier to use.
The mix should be compressed so that a gap of about 25mm (one inch) is left around the container, enough to allow for top-dressing and watering. Try to keep the pressure even, as you are aiming for uniform conditions for your seeds.
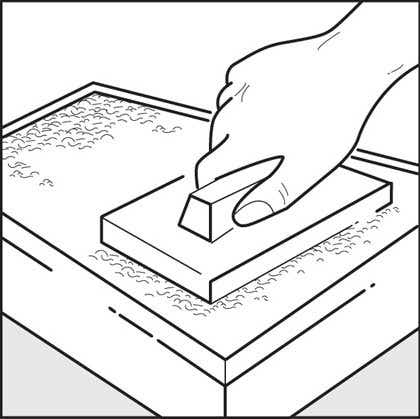
Forming the seed bed.
SOWING YOUR SEED
1. Be Prepared!
Often the most critical stage of the whole process is the act of transferring seed from the packet onto the seed mix. Enthusiasm can turn to horror as the precious seed is spilled onto the floor and oblivion. Many of the pitfalls can be side-stepped by planning your operation. Have all your containers filled and prepared and other equipment ready before opening the seed packet.
Always read the instructions on the packet first. They will usually tell you how and when to sow as well as highlighting temperatures required for germination.
Certain types of seed, such as many species of Australian native plants, may need special preparation before planting, such as soaking in hot water for a period of time.
Choose a sensible work place (unless you are sowing in-situ in the open garden). Always sow seeds in sheltered conditions well away from breezes and droughts.
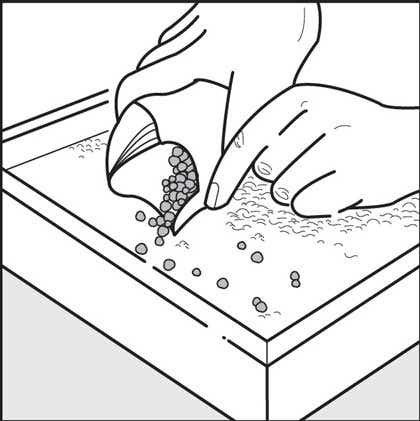
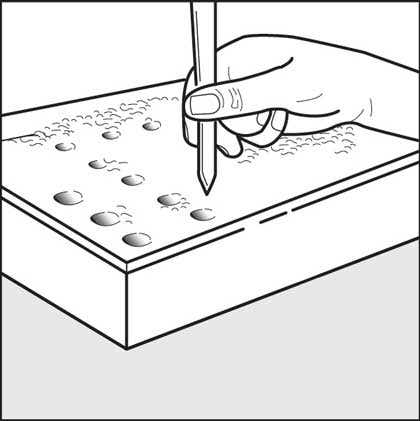
Sowing the seeds.
2. Sowing
Some seeds can be as fine as dust so take care when opening the seed packet. Make sure that the seed is opposite the end before being opened. The packet itself can now used as a dispenser. Cut off the corner, tip the packet forward, slightly tapping it so the seeds fall out of the opening. Whilst you are doing this, move the packet slowly over the surface so the seeds are broadcast evenly.
Uneven sowing can be rectified by gently teasing seed into gaps using a blunt knife. Unless they are very large, avoid handling the seed with your fingers. Your sweat contains a variety of acids and chemicals which can damage thin walled seeds, even preventing them from germinating.
3. Watering
When the seeds have been sown they should be watered in. Pots containing larger seeds can be watered in from the top using a watering can with a fine rose. For fine seeds, soak the container in a bath of water. Ensure that the level does not come over the sides of the pot. Leave to soak until the surface is evenly wet, then lift them out and allow to drain.
ONGOING CARE
1. Watering
Continue to water sparingly until germination keeping the mix ‘dark’ damp (ie. moist not wet) until seedlings emerge. As they grow stronger, thorough but less frequent watering is required. Morning rather than evening watering is best.
2. Germination
Place the seed trays in a position where they can germinate. Choose a well lit area with good ventilation. On very hot days, move the tray to a semi shaded position.
Information regarding ideal temperatures is usually written on the back of the packet or can be found in gardening books. If growing in a greenhouse, pots should be placed where they receive sufficient heat and light.
3. Pests
Slugs and snails love to graze on young, succulent seedlings and a night of their attentions can be catastrophic. Take the precaution of protecting your seedlings by sprinkling a little snail bait in and around pots. Inspect the seedlings as often as possible, cleaning up the bodies of unfortunate victims.
4. Diseases
Damping off disease turns the base of the seedling brown and kills it. The disease is encouraged by planting seedlings too close and by overwatering. As a preventative measure, seeds can be watered with a copper-based fungicide -ask for advice from your Home Hardware.
5. Feeding
Fertilise with half strength Thrive, Aquasol, Maxicrop or Nitrosol Soluble Fertilisers about once a week after the seeds germinate.
PLANTING OUT
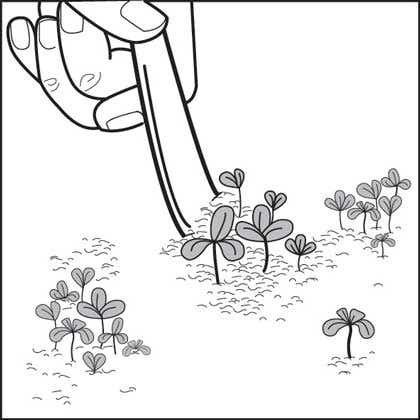
Once your seedlings are big enough to handle, (start to overcrowd each other) prick them out individually into seed trays or pots filled with a suitable potting mix. Before transplanting into other trays or pots, make a hole using a dibber or wooden pencil, deep enough for the roots to dangle straight down. Remove the seedlings from their tray with a knife or spatula. Make sure that you only hold them by their leaves, as the stems can easily break. Gently separate each seedling and place it in the hole you have made.
It is advisable to leave the plants outside with partial shelter so as to harden them off.
Once your seedlings are growing, pot them into a quality potting mix. Raising plants from seed is really fun. Best of all, you're likely to be inundated with more plants than you can handle. Give them to a neighbour - you can always take pride in your efforts, after all you raised them yourself!
Make transplanting holes.
Removing seedlings.

Gently separate seedlings.
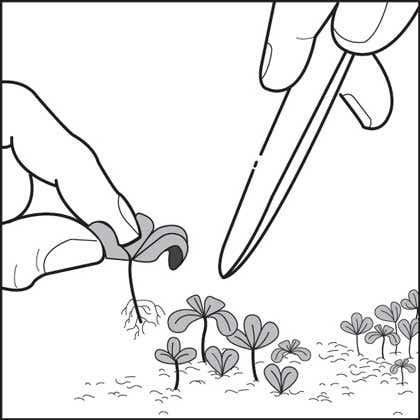
Place seedlings in holes.
TIPS FROM THE TRADE
- Avoid sowing seed too thickly.
- Keep the seed bed constantly moist. To allow seed or young seedlings to dry out, if only for a few hours, may cause their death.
- Wind and careless watering, can spoil a bed of seed by causing movement of the seed as it is germinating.
- Ants, birds, rodents, not to mention other animals, may all take or damage seed or young plants just appearing above the ground.