


- 12 October 2020
Build your own timber gates
TIMBER GATES MADE EASY
Gates often have definite personalities which can affect the whole feeling and mood of a house and garden. They must therefore be planned and designed with care.
An entrance gate usually tells something about the people who live in the house beyond. It is usually the first thing visitors encounter and the visual impression can be inviting or forbidding, formal or informal, romantic or functional.
A well-made timber gate will enhance the appearance of your property and provide privacy, safety and durability. Any gate should be designed to suit your needs - if you have a dog that jumps over low gates, then the criteria for your new gate will be different from someone who just needs to define an area or boundary.
Ready-made gates in various styles and materials are available, but you’ll get greater satisfaction by designing and building your own to exactly the style and size you want and probably save some money as well.
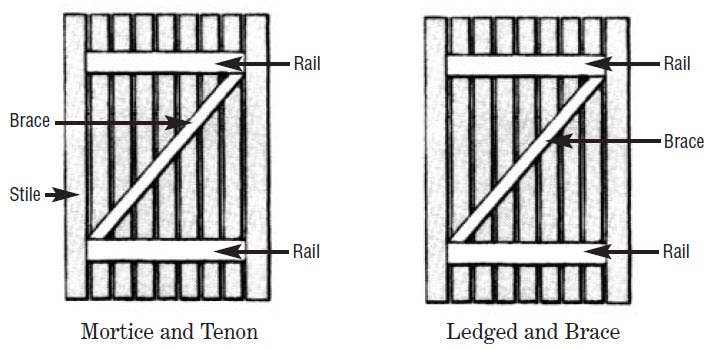
The two styles demonstrated in this project.
TOOLS REQUIRED
MATERIALS REQUIRED
Rails
stiles (vertical posts)
diagonal brace
pickets
STEP 1
Measuring Up
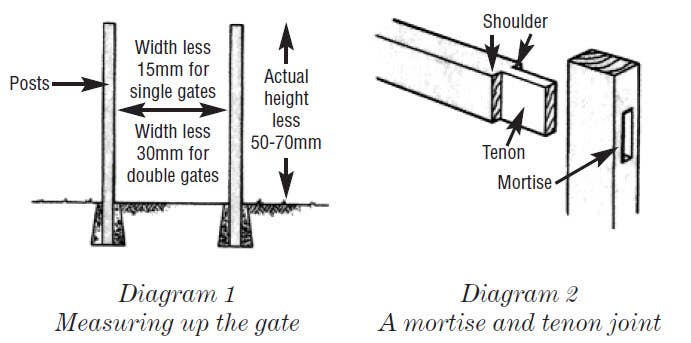
Measure the height from the ground to the top of the post and the width of the gate opening required. Then subtract 50mm from the height to give necessary ground clearance at the bottom and then take 15mm from the width for side clearance (see Diagram 1). To work out the number of pickets required for your gate, use the following example - if the gate opening is, say, 900mm, divide 900mm by the width of the picket - 70mm + 5mm gap or 75mm. This equals 12 pickets. Use the same type of calculation if you use wider pickets or want larger spaces between them.
STEP 2
The Frame
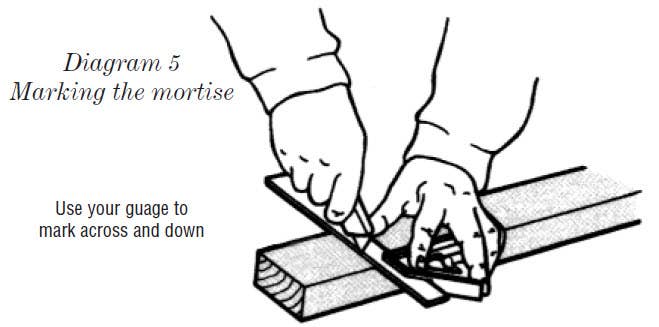
Cut a tongue (tenon) out of the rail at each end which is then fitted into a matching slot (mortise) in the vertical stile (see Diagram 2). There are variations, but the one used for our gate frame is called a Barefaced Mortise and Tenon - the tenon in this case has only one shoulder (see Diagram 3).
The Tenon
Mark both sides of the rail - lay the post on the rail and mark a line where the tenon begins using autility knife and carpenter’s square (see Diagram 4), allowing 5 mm longer than the width of the post (this extra is planed off after the joint is made for a neat finish). Then set your marking gauge to half the width of the rails and score a line across the end of the rail and down both sides. Now clamp the rail in a vice and cut along the line, then lay the rail flat and cut along the baseline to remove the waste. Use a chisel to clean off the tenon.
The Mortise
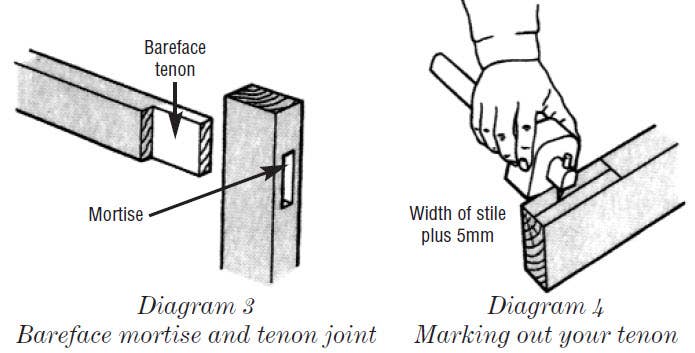
Mark out the positions of the rails on the stiles (if the gate is more than 1.2m high, it needs to have three (3) rails-top, centre and bottom). Place the tenon on the rail, marking its width on both sides. Using a carpenter’s square and utility knife, square the lines across and set the marking gauge to the overall width of the rail (Diagram 5). Draw a line on both faces of the stile between the rails two (2) width lines. Re-set the marking gauge to the width of the tenon and draw a line to give the width of the mortise.
The actual mortise is made by using a drill bit slightly smaller than the hole required, then drilling several holes in a line to remove most of the mortise - don’t drill the holes right through, only about halfway; now turn the stile over and drill through from the opposite side, cleaning out the mortise with a sharp chisel to leave a nice clean and square opening.
The Joint
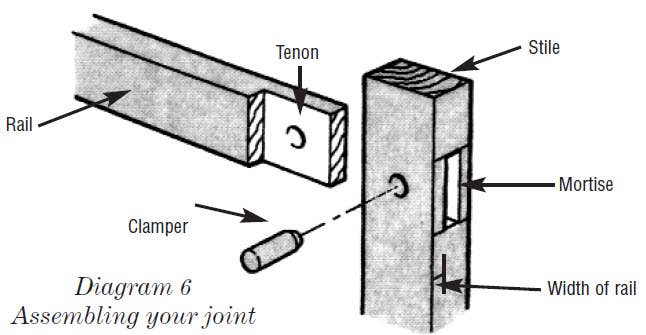
Drill a 19mm hole through the centre of the mortise for a short hardwood 19mm dowel. Fit the joint together and mark the hole position on the tenon, now remove the tenon and drill a 19mm hole in the tenon about 2mm back from the marked position towards the shoulder of the tenon. Now refit the tenon to the mortise and using waterproof glue, drive the short dowel through (see Diagram 6). With the holes offset slightly the tenon should draw tightly to the stile making a very strong joint without the need for screws or nails.
When you have completed all four (4) joints, the frame should be checked for square by measuring across the diagonally opposite corners; if it isn’t square, simply put some gentle pressure on the other diagonal until the measurements are equal, also now check for any warp in the frame as well. Tack a temporary brace across to hold it square until the permanent diagonal brace is fitted. Lay the brace piece across the frame so that the bottom end is at the hinge point with the top end adjacent to where you want the latch fitted; this will ensure that the weight of the gate is transferred to the post side and so stop the gate from sagging. Mark the brace on the angle where it meets the stile and cut the ends so that it fits neatly inside the top and bottom rails and screw into place. Remove the temporary brace and plane off any protruding dowels or tenons and smooth with sandpaper.
The Pickets
Now lay the completed frame on a flat surface, remembering which way the brace should go, this will tell you which side is the front. With this side up, place the pickets in position at the correct spacing which you will have worked out at the beginning when deciding on the width of your gate. Fix them in position with plated bugle screws which have a phillips head drive and preferably with two (2) screws per picket to each stile and one (1) where the pickets cross the angle brace.
STEP 3
Ledged and Braced
The same steps can be taken for the pickets or boards required in ‘Measuring Up’ but, if leaving gaps, use a straight piece of suitable timber as a spacer. Layout the pickets, measure the overall width, cutting the top and bottom rail 20mm shorter than the pickets. This will leave 10mm clearance on each side. Place the rails parallel across the pickets and fasten them to he pickets (first making sure they are square) using plated screws or galvanized nails. The diagonal brace is fixed in the same way.
STEP 4
Installation
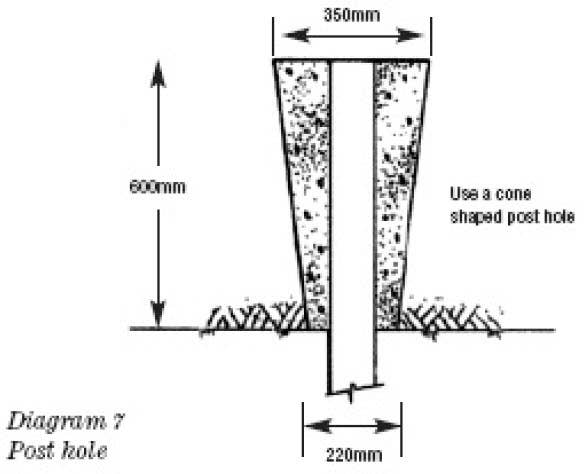
Suitability is the most important factor when installing a gate – the post hole should be at least 60mm deep x 350mm wide at the top and 220mm wide at the bottom (see diagram 7). The post should be braced back to the ground to hold it straight and plumb, then pour premixed wet cement into the hole and tamp down well around the post. Use a spirit level to check that the post is vertical. Also, if you are putting in two (2) posts at each side of the gate, double check that space between is the right distance for your gate and also parallel and vertical at the top and bottom.
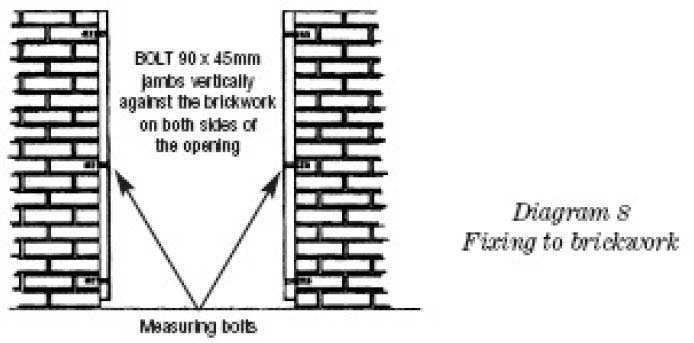
If the gate is to be fixed to brickwork, use a piece of hardwood 90 x 45mm as a jamb fixed vertically to the bricks at either one or both sides of the opening using dynabolts (see Diagram 8). Use three (3) fixings spaced evenly at the top, centre and bottom for best suitability, particularly if the gate is higher or wider than normal. It is also advisable to drill into the brick itself, rather than into the mortal joint as the dynabolt will hold better in the brick.
Now fix the hinges in place on the stile; these are usually placed around 150mm up from the bottom and down from the top. Sit the gate in the opening on timber chocks and line it up (see Diagram 9). With the gate lined up correctly, drill and fix the top screw in each hinge on the post and check that it then swings freely. If it doesn’t, recheck the alignment with the posts and maybe re-adjust the screws until the gate swings OK. Then put in the remaining screws.
STEP 3
Ledged and Braced
The same steps can be taken for the pickets or boards required in ‘Measuring Up’ but, if leaving gaps, use a straight piece of suitable timber as a spacer. Layout the pickets, measure the overall width, cutting the top and bottom rail 20mm shorter than the pickets. This will leave 10mm clearance on each side. Place the rails parallel across the pickets and fasten them to he pickets (first making sure they are square) using plated screws or galvanized nails. The diagonal brace is fixed in the same way.
STEP 4
Installation
Suitability is the most important factor when installing a gate – the post hole should be at least 60mm deep x 350mm wide at the top and 220mm wide at the bottom (see diagram 7). The post should be braced back to the ground to hold it straight and plumb, then pour premixed wet cement into the hole and tamp down well around the post. Use a spirit level to check that the post is vertical. Also, if you are putting in two (2) posts at each side of the gate, double check that space between is the right distance for your gate and also parallel and vertical at the top and bottom.
If the gate is to be fixed to brickwork, use a piece of hardwood 90 x 45mm as a jamb fixed vertically to the bricks at either one or both sides of the opening using dynabolts (see Diagram 8). Use three (3) fixings spaced evenly at the top, centre and bottom for best suitability, particularly if the gate is higher or wider than normal. It is also advisable to drill into the brick itself, rather than into the mortal joint as the dynabolt will hold better in the brick.
Now fix the hinges in place on the stile; these are usually placed around 150mm up from the bottom and down from the top. Sit the gate in the opening on timber chocks and line it up (see Diagram 9). With the gate lined up correctly, drill and fix the top screw in each hinge on the post and check that it then swings freely. If it doesn’t, recheck the alignment with the posts and maybe re-adjust the screws until the gate swings OK. Then put in the remaining screws.